

Crumpet User Manual
Crumpet is a better editor for Return to Wonderland custom levels.
This document describes how to install and how to use Crumpet to its full potential. If you already mostly know what you're doing, you should jump to the cheat sheet section for a much shorter explanation of how to use Crumpet's features.
Introduction
The built in editor in Return to Wonderland sucks. Building a level is very inconvenient, slow, and annoying. This is why I made Crumpet, an editor aimed at removing these problems so you can build better levels faster, and have fun doing so.
How is Crumpet better?
- drop-down list for tile categories lets you switch between categories faster
- dual control editing lets you hold on to two tiles at the same time, one for each mouse button
- middle click to pick a tile already on the map, instead of having to find it in a category
- support for hex edited tiles*
- infinite undo
- real time online co-op editing*
- move tiles in the level without having to change the current tile category
- preview current tileset in the editor instead of the editor's unique textures*
- support for any screen resolution (so long as it's larger than 650×670)
- infinite scroll in any direction, level size automatically adjusts to what you place rather than what you place being constrained by the set level size
- zoom out to get an overview of the level or zoom in to place tiles more precisely
- much less messy sign editor
- better keyboard shortcuts
- save files 100% compatible with built in editor and player
- and more!
(* = planned or incomplete feature)
Get started
Crumpet runs in your browser. You can view and use the fully functional demo online, no installation required.
However, since web browsers won't let Crumpet edit your save files directly, you have to install it for more convenient file access. (as in, you must install it to be able to save files directly to your CustomLevels folder)
To learn how to install Crumpet, jump to the installation section.
Overview
Here's a picture of the interface:
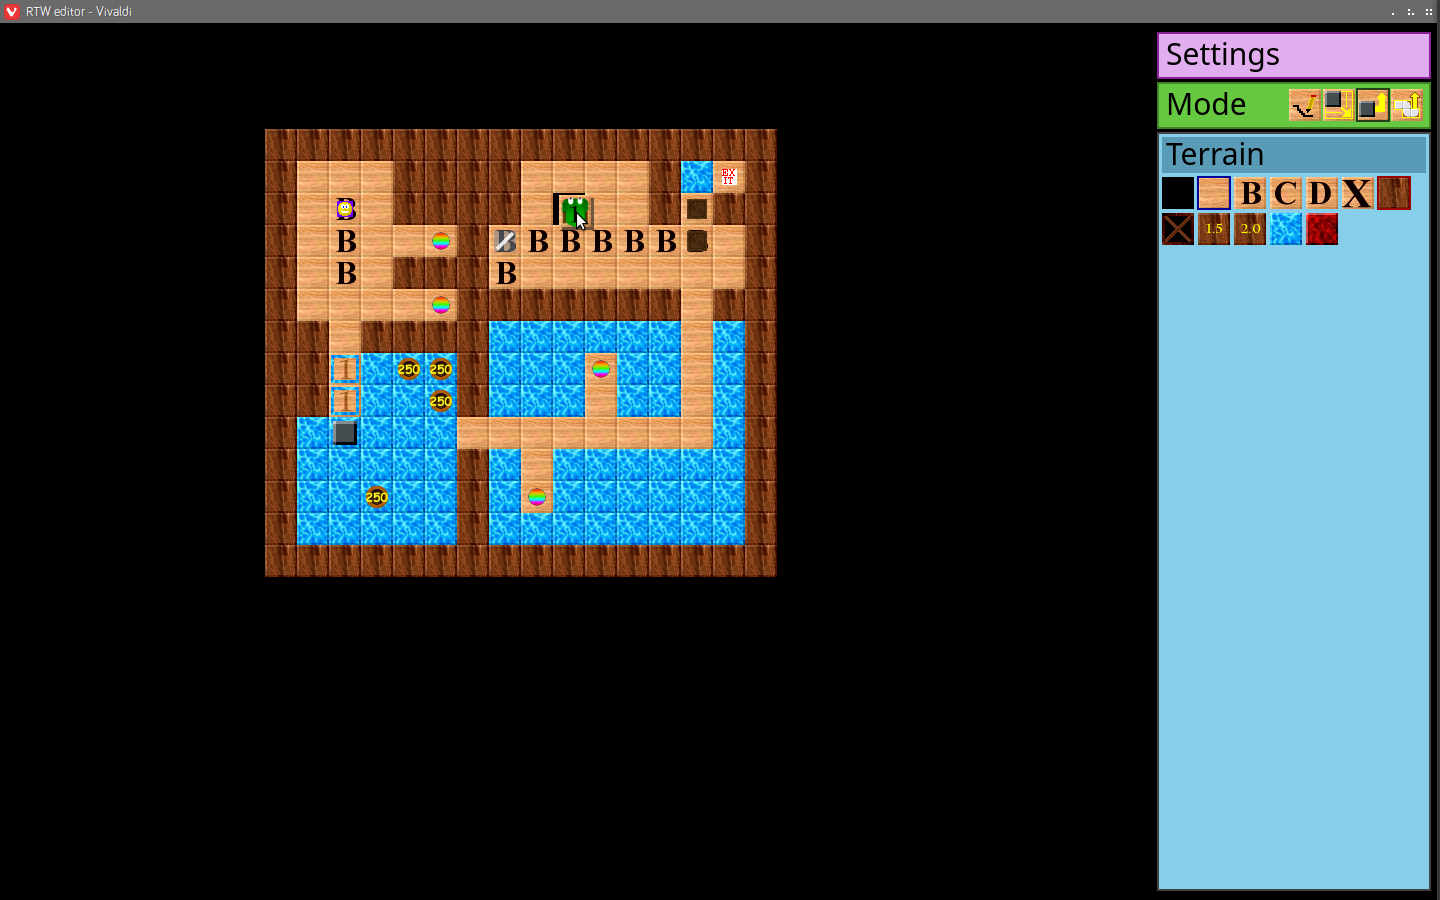
The big black space with tiles in it is the main level design area, otherwise known as the map.
The blue panel on the right side of the screen contains tiles that you can place. You can click the dark blue header to change the tile category.
The green panel lets you change the tile place mode, otherwise known as the tool box. The current mode is outlined in dark green. The leftmost icon with the pencil lets you place tiles as you would expect from the builtin editor, and is the most useful.
The pink button opens and closes the settings menu.
Basic tile placement
First, you need to pick some tiles to place. Let's place some floor tiles. Floor is found in either the "common" category or the "terrain" category. Open the category picker by clicking the dark blue header, then click on the word "common" to open that category.
Now that the category is open, you can select the floor tile by left clicking it. Once it is selected, a blue border will appear around it.
Now that the floor tile is selected, you can place it on to the map by left clicking where you want it to be placed. You can left click and drag to place a line of tiles.
You now know enough to a build a whole level, but there are several techniques that make building a level much faster and more enjoyable.
Advanced editing
Blocks of tiles
Once a tile is selected and has a blue outline, as well as placing it normally by left clicking, you can also create a block of tiles by middle clicking and dragging. A rectangle will be created with the first corner at where you clicked and the opposite corner at where you released.
Middle clicking and dragging might be difficult for some users, so there are some alternatives. One alternative is to press both the left and right mouse button at the same time. The other alternative is to use the block tool.
Select the second item in the green tool box, and you'll be able to left click and drag to create a block. Once you're done making blocks, don't forget to set the tile mode back to the ordinary pencil by clicking the first item in the tool box. You can also switch to block mode by pressing either B or S on your keyboard, and back to pencil mode afterwards by pressing A.
Dual control
As well as selecting tiles with the left mouse button, you can also select a different tile with the right mouse button. Doing so will give that tile a red outline, and right clicking on the map will place whichever tile has the red outline.
Note that you cannot create blocks of tiles with the right button, only the left button.
Pick tile
Middle click an existing tile on the map to give that tile a blue outline, which means you can now place it with the left mouse button. This makes it really easy and quick to change between different tiles.
Be sure not to move the mouse while middle clicking, otherwise you'll start making a block. If you accidentally make a block, you can press Ctrl-Z to undo it.
Undo
Press Ctrl-Z to undo the last thing you placed. You can keep pressing Ctrl-Z forever to undo changes infinitely, but be careful, since there's no button to put the tiles back if you undo too much.
If you close the editor, you'll lose the undo history.
If you make some changes, then load a file, pressing undo will be able to take you back to before the load. Be very careful with this.
Scroll and zoom
Spin the scroll wheel to scroll the map vertically. Hold shift at the same time to scroll the map horizontally. Hold control at the same time to zoom in or out. Press 0 on the keyboard to reset zoom and scroll back to the initial position.
Move tile
You can use the move tool to move a single tile on the map to another position. Select the move tool, the third icon in the tool box, and then drag a tile to move it to another position on the map. You can also press D to switch to the move tool from any other tool.
Don't forget to switch back to pencil mode afterwards.
Ice path
The final tool in the tool box creates an ice path. Drag on the map where you want your path to go, and when you release the mouse button, parts of the path will be turned into corner pieces so that stinkers can slide from one end to the other. This is much more convenient than switching to and placing all those corner tiles manually.
You can also make a path of conveyor belts. To do this, left click to select any conveyor belt tile with a blue outline. Now, dragging the mouse will create a path of conveyor belts instead of ice.
Left click select a non-conveyor tile to go back to making ice paths.
You can also press F to switch to the ice path tool. Don't forget to switch back to the pencil (A) when you're done.
Settings
Click the pink button to open or close the settings menu.
When settings is open, you can set the level name, the filename it should be saved as (.LV6 extension will be added automatically), the tileset, the background, the music track, the timer, and any custom content directory names.
A filename is required to be able to save your level.
You can also see the size of your level as its width and height. If it's less than 14×14, you'll see a warning in that menu, since the builtin editor's minimum size is 14×14. However, most levels should still work properly even if they're smaller.
Saving and loading
Crumpet has two types of file management. The first is to use the browser's download and upload methods to get and send files to your computer. This method is very cumbersome to use.
The second method is to save and load files directly from your CustomLevels folder. This method is much more convenient, but does not work when accessing the page on the website cadence.moe. You have to install Crumpet to be able to use this method. Jump to the installation section.
You can mix and match the loading and saving methods in whatever way you like, and they will not interfere with or break each other.
Using files directly
Click "save (direct)" to save the current file into your CustomLevels with the name specified in the input box.
Click "load (direct)" to load from your CustomLevels with the name specified in the input box and overwrite the current map.
Downloading and uploading
Click "save (download)" to start a download of the current map data. Depending on your web browser, the file will probably go into your computer's Downloads folder, and you'll need to manually move it to CustomLevels to play it.
Click "load (file)" to open a dialogue box asking which level to load. If you want to load a file stored in CustomLevels, you can, but you'll probably have to spend a moment manually navigating to that folder.
Installing Crumpet
Prerequisites
Crumpet requires node.js 10+ and 7-zip. You need to install these first. You can install them in any order. If you already have one installed, you don't need to install it again.
node.js
Windows
Go to the node.js website and click the big button with "LTS" written on it to download the node.js installer. Run the installer. Click "next" or "yes" through every screen of the installer.
Ubuntu
curl -sL https://deb.nodesource.com/setup_10.x | sudo -E bash -
sudo apt-get install -y nodejs
Source: https://github.com/nodesource/distributions/blob/master/README.md#installation-instructions
Arch
sudo pacman -S nodejs
7-Zip
Windows
Go to the 7-Zip website and look at the list of links at the top of the page. Click the "Download" link that's next to "64-bit x64" to download the installer. Run the installer. Click "install".
Ubuntu
sudo apt install p7zip-full
Arch
sudo pacman -S p7zip-full
After you have installed both node.js and 7-Zip, you can move on to the next section.
Automatic installer
For most systems, you should be able to use Crumpet's automatic installer.
First, open the install script. Right click the background of that page and choose "save as" or "save page as". Save the file on to the desktop with the name "install.ps1".
Run the installer by right clicking the new install.ps1 file and choosing "run with powershell". If you get asked "are you sure you want to open this", uncheck the "always ask" checkbox and then click "open".
Follow the instructions in the Crumpet installer. If Crumpet eventually opens in your browser, then congratulations, it worked! You're done.
Manual installation
Download and extract this zip file containing Crumpet.
Open npm-install.bat, and once that finishes, open start.bat. Crumpet should run the configuration process and then open.
The configuration page
If you got sent to the configuration page, that means something in the automatic detection process went wrong. Follow these steps to fix it.
First of all, make sure Return To Wonderland is installed on this computer, and make sure you haven't modified the file res2.dat. (e.g. installing custom textures or mods might replace res2.dat.) You won't be able to install Crumpet unless you have an official unmodified copy of res2.dat, to prevent software piracy.
Push "detect installation", and the text boxes should fill with data. If they don't, you should manually insert the paths to RTW's installation folder and CustomLevels folder into the text boxes. After pressing the detect button or typing things in, you'll need to press "save paths" to confirm.
After filling in the boxes, press "install/update" to verify that your RTW installation is legit, and download the Crumpet textures from the server. Once the message changes to "images are installed", you can click the link at the top of the page to open Crumpet. If you see an error alert, you should try to figure out what the errors means and resolve it on your own.
Running Crumpet again
If you used the automatic installer, click the new Crumpet shortcut on your desktop and Crumpet will open immediately.
If you installed manually, open start.bat, which will launch Crumpet.
Need help?
Reply to the topic on the forums and I'll do my best to help you.
Development screenshots
June 1 to 7
Spamming wood blocks / Three buttons / Actual tile selector / Several tiles / Dropdown selector / Use in game textures / Use editor textures
November 12 to 18
Options menu / Ice paths / Hex display / Actual game saves
May 4 to 10
Configuration page
And lots and lots of finishing touches.
Cheat sheet
Left click or right click to place tiles assigned to that mouse button.
Middle click to pick the hovered tile to the left mouse button.
Middle click and drag to create a block of tiles with the tile from the left mouse button.
Mouse wheel scrolls up/down, shift+mouse wheel scrolls left/right, ctrl+mouse wheel zooms in/out.
Ctrl-Z is infinite undo. No redo, so be careful.
The green box contains tile placement tools. The tools, from left to right, are pencil (A), block (S or B), drag and drop (D), ice path (F).
Select a conveyor tile and use the ice path tool to create a conveyor path instead.
The purple button opens the screen of settings and save/load buttons.
Using the "direct" buttons will save directly to the CustomLevels folder on your computer.